Welcome to Skynamo Field Sales App for ERP Go
This guide walks you through connecting your ERP Go instance to Skynamo.
The setup process is designed to be completed with no prior Skynamo experience. From start to finish.
Work through the steps in order, and don't skip the data review step; it's the most important quality check before your team gets access to the system and goes live.
If you get stuck at any point, the Skynamo Customer Success team is available at support@skynamo.com
Before you start
Please make sure you have access to the following before beginning setup:
- Your unique Skynamo Instance - you would have received a Welcome mail with these details
- The ERP Go (Formerly IQ Retail) server you want to link to Skynamo - this is also where you will install the integration software, so make sure you have easy access to it
- Make sure your ERP company is licensed for API access
- The relevant ERP Go company code
- ERP Go user credentials with API access enabled
- The terminal number and cashier number to use for the integration
Step 1: Create a new Skynamo instance
In the Skynamo Subscription Management Portal (app.skynamo.me), create a new Skynamo instance.
This instance should match the ERP Go company or branch you want to integrate with.
For example, if you have separate ERP Go companies for Cape Town and Johannesburg, create separate Skynamo instances for each:
BuildingCoCPTBuildingCoJHB
Important: Each Skynamo instance can only be linked to one ERP Go company.
Step 2: Complete the Basic Company Configuration
Navigate to Settings & “Edit Configuration”
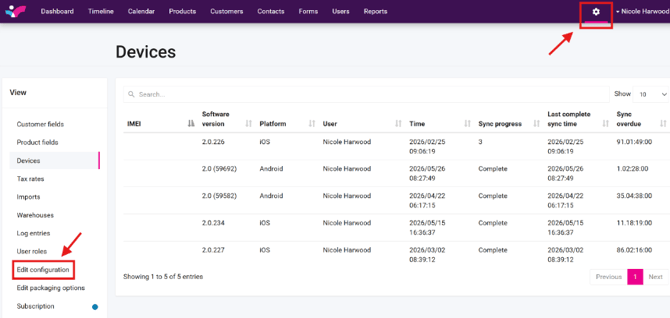
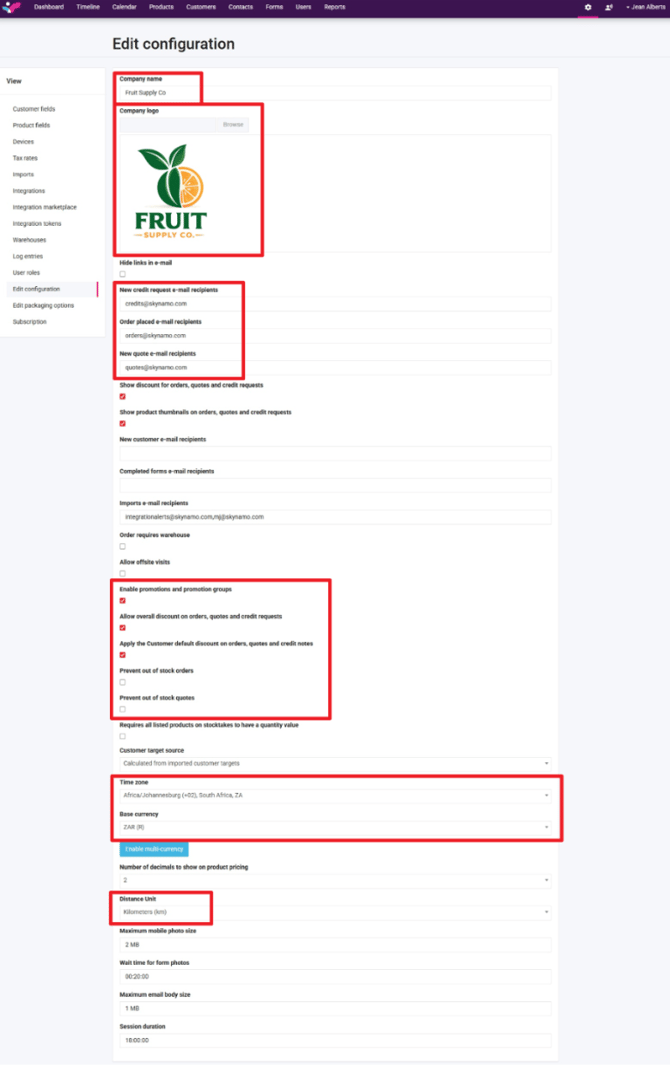
On the Configurations page, review and update your company settings. At a minimum, please make sure the following details are completed:
- Company name
- Company Logo
- Default Currency
- Time Zone
Step 3: Create Customer and Product Fields
|
! |
Set up your customer and product fields now, before you reach Step 5 (the Integration Marketplace wizard). If you start that wizard first and need to back out partway through, you'll have to start it again from the beginning, so it's worth getting your fields ready first. |
|
Customer and product fields display the information you see in the customer and product profiles on Skynamo. These can mirror the fields you have for products and customers on ERP Go.
These can be created to display only the information you want your team to have visibility of from your customer and product cards/profiles on ERP Go. You might, for example, want to give them access to see Credit Limits on Skynamo but not Outstanding Balances.
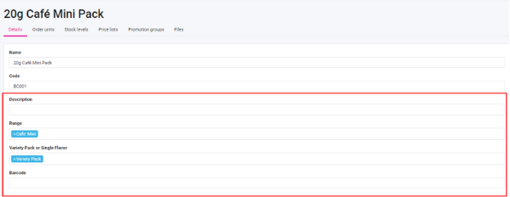
As an example for products, on Skynamo, when you open a product and navigate to the details tab, the product fields created will be the details that are listed below the “Code”
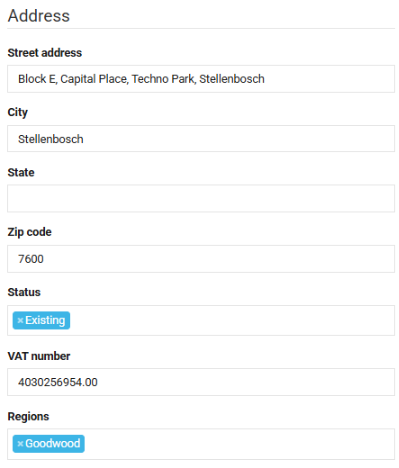
An example for customers, when you open a customer profile the “Delivery Address” linked to the customer profile is a customer field created.
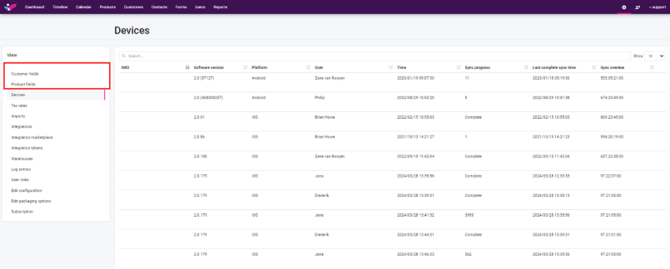
To create the customer and product fields:
- Navigate to settings and select “Customer Fields” or “Product Fields”
- Use the question options on the left-hand side to create fields
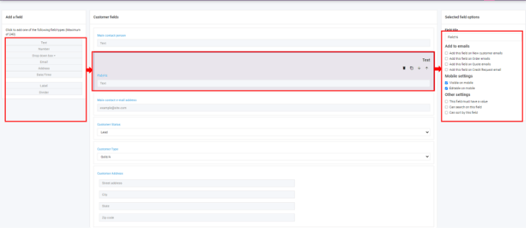
Important: customer/product name and code are automatically generated; you do not need to create fields for this.
|
! |
Recommendation:
Use Text fields for email addresses, telephone numbers, and similar contact details. Other Skynamo field types may apply validation rules that IQ Retail data does not always meet, which can cause integration sync failures.
|
Tip: Use Appendix A at the end of this guide to review the customer and product data fields synced from IQ Retail. This appendix can help you decide which fields to create in Skynamo before completing the integration setup.
The articles below explain this process in more depth:
Step 4: Prepare IQ Retail for the Integration
Before you connect ERP Go to Skynamo, a few things need to be set up on the ERP Go side first. This is a once-off setup.
Set the IQ REST API listening port
Skynamo connects to IQ Retail through its REST API, which listens for the connection on a specific port. By default, this port is set to 0, which means it isn't listening for anything, so this is easy to miss.
Steps:
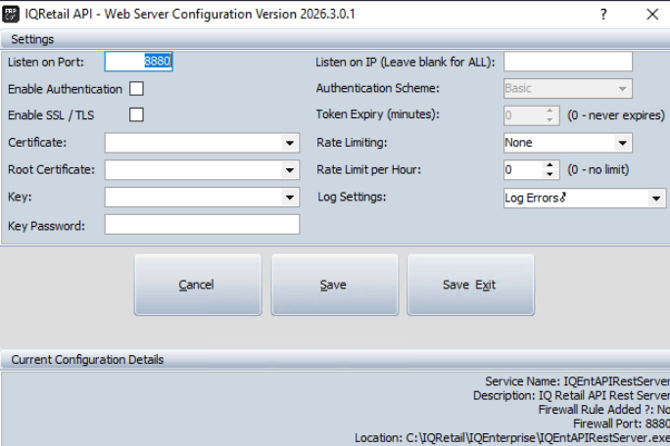
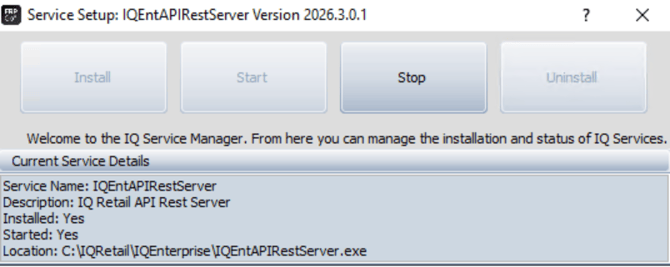
- Open the IQ Enterprise API Rest Server Application, which can be found in the base install directory of IQ Retail (usually located at: ‘C:\IQRetail\IQEnterprise\IQEntAPIRestServer.exe’)
- After entering your login details, navigate to Setup > Web Service Configuration
- Change the listening port to an unused port on your server (8880 is commonly used)
- Click ‘Save Exit’
- It’s also good to restart the web services at this point by navigating to Setup > Service and then clicking the Stop button followed by the Start button.
|
! |
You'll need this port again shortly. When you enter your IQ Base URL into Skynamo. |
Set up API access for your IQ user
Skynamo connects using a specific IQ Retail user account. That user needs API access switched on, and a password generated for the API connection.
- Log into IQ Retail Enterprise on the company you would like to integrate
- Open Utilities > Setup > Menu Access and Security > User and Group Maintenance
- Select the Users tab
- Add or find the user you would like to use for the integration, then select it and click Edit User
- Check the box: Allow API Access
- Check the box: Check to ‘Change Pin Code’, and enter a pin code (example: 1234)
- Click ‘Generate Key’
- In the API Endpoint Access section, click ‘Select All’
- Click ‘Accept’
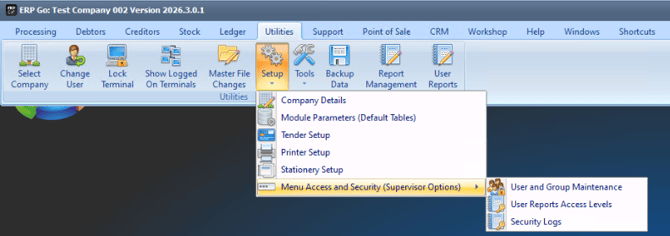
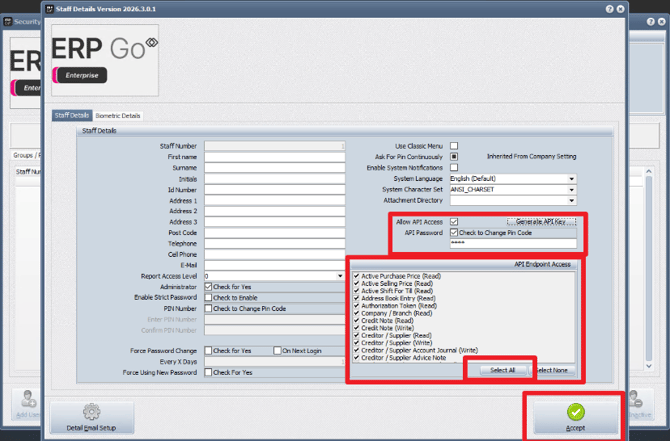
FYI: IQ Retail will show you a SHA1-encoded version of the password you entered when you select ‘Generate Key’. You won't need this for Skynamo, when you enter your IQ Retail user password into Skynamo, always use the API pin password you typed above, not the SHA1 version IQ Retail displays.
Test your connection before entering it into Skynamo
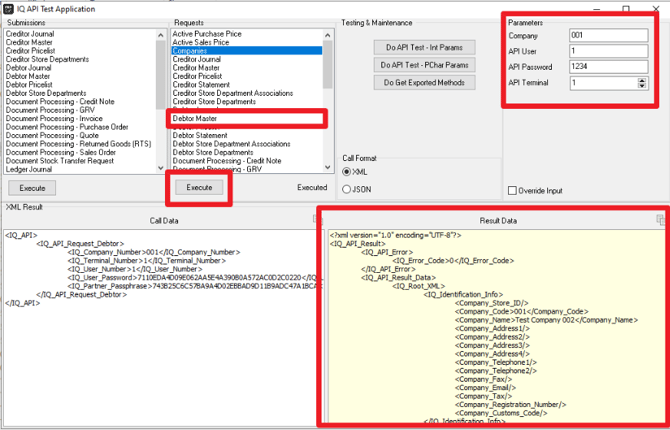
Before entering any of your connection details into Skynamo, it's worth confirming everything works using the IQ REST API Test application (C:\IQRetail\IQEnterprise\IQEntAPITest.exe).
Steps:
- Open the application, and enter the credentials you set up above, under ‘Parameters’
- Then select any endpoint under the Requests section (example ‘Debtor Journal’) and hit the execute button
- You should see data appear under the ‘Result Data’ section, which means the API is working as expected and the credentials are correct.
|
! |
If you see the error “User does not have API Access”, go back to the steps above and double-check that the Allow API Access box is ticked and that you've generated a key for this user. |
Step 5: Open the Integration Marketplace
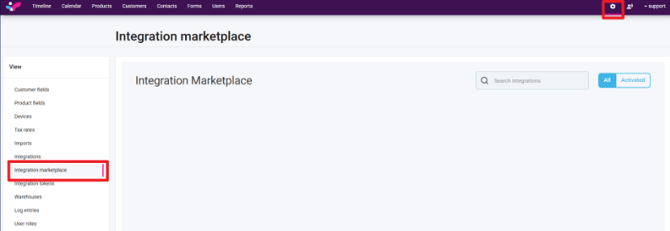
Navigate to the Integration Marketplace tab under ‘Settings’ on Skynamo Insights. Skynamo will automatically recognize you as an ERP Go customer if you are subscribed to an ERP Go Integration with Skynamo, so you'll be taken straight to the Download and Install page shown in the next step.
Step 6: Download and Install Skynamo Link
|
! |
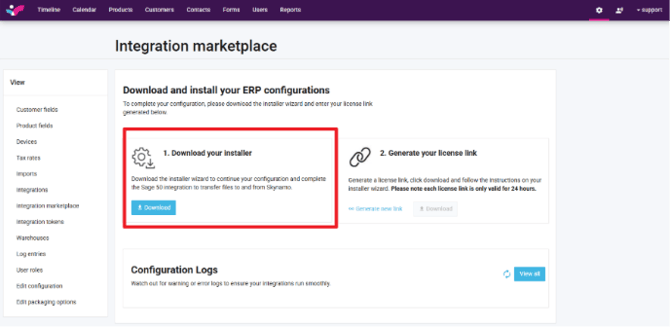
Skynamo Link must be installed on your IQ Retail server itself, not on a separate PC, laptop, or any other server. If it's installed anywhere else, it won't be able to see the IQ Retail API and your data, and the integration won't work. |
Download and install Skynamo Link on your ERP Go / IQ Retail server.
Step 7: Enter Your ERP Go Connection Details
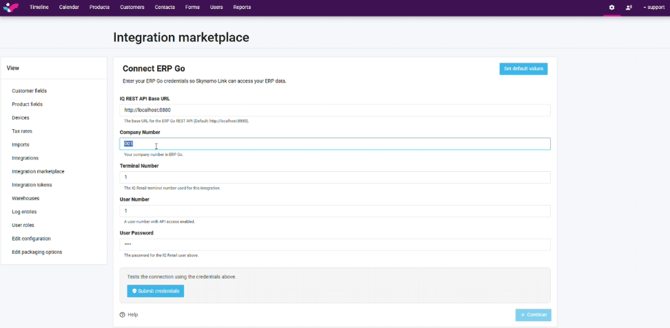
Once Skynamo Link is installed and running on your IQ Retail server, go back to the Integration Marketplace page in Skynamo Insights. This page will automatically refresh and prompt you to enter your ERP Go connection details directly on screen.
|
Field |
What to enter |
|
IQ REST API Base URL |
The web address of your IQ REST API, including the port number you set up in Step 4. For example: http://localhost:8880 |
|
ERP Username |
The IQ user number of the user you set up for API access in Step 4 |
|
ERP Password |
The plain-text API password/pin code for that user — not the SHA1 password IQ Retail shows you (see Step 4) |
|
ERP Company Code |
The IQ Retail company code Skynamo should integrate with. Example: 001 |
|
Enterprise Directory Path |
The installation location of IQ Retail on your server |
|
Terminal Number, Cashier Number & User Number |
These identify the till point, cashier, and user that Skynamo orders will be recorded against in IQ Retail. If you're not sure which numbers to use, check with your IQ Retail administrator. |
Step 8: Configure Your Integration
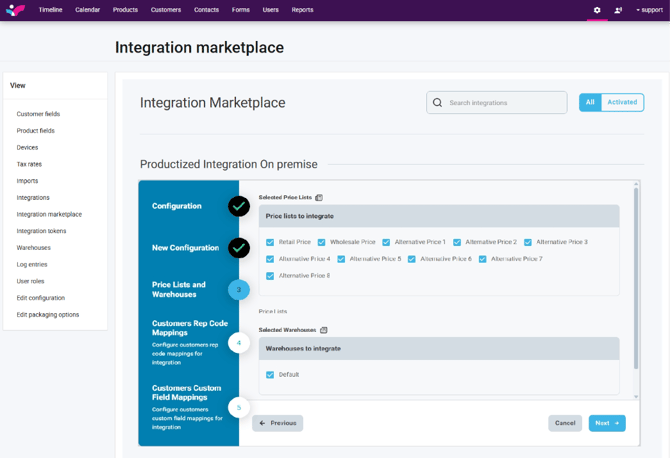
Once the integration has been connected, you can review and customize your integration setup from the Integration Marketplace tab in Skynamo Insights.
This step allows you to configure options such as:
- Excluding certain data fields
- Excluding specific price lists
- Setting up filter rules for products
- Setting up filter rules for customers
- Controlling which data should be visible in Skynamo
|
! |
Good to know: IQ Retail lets you restrict customers in various ways, for example, by blocking new orders while still allowing quotes for on-hold customers. Skynamo doesn’t mirror these rules in the product, but they are honoured when orders and/or quotes are pushed back into IQ Retail. However, filtering and deactivation rules can be set up based on various customer fields pulled from IQ, allowing you to make specific customers unavailable to users in Skynamo. |
Step 9: Connect Skynamo Services
Navigate to "Integration" in settings and select the connect button for "Skynamo Services" 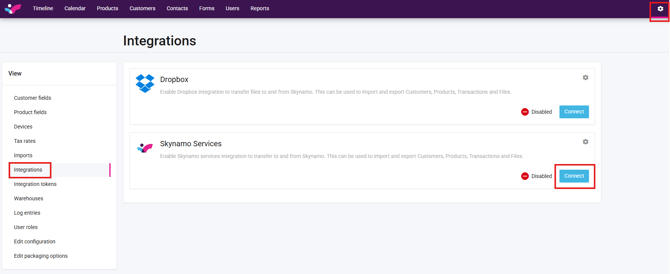
Step 10: Review Your Data
Tip: If you've just finished the previous steps, remember the first sync can take up to an hour, give it some time before you start reviewing.
Review the data that has synced into Skynamo. Please follow the article below to ensure you have configured it correctly:
Only continue once you are happy that the integration is configured correctly and that your ERP Go data is displayed as expected in Skynamo.
Step 11: Default Skynamo User Roles
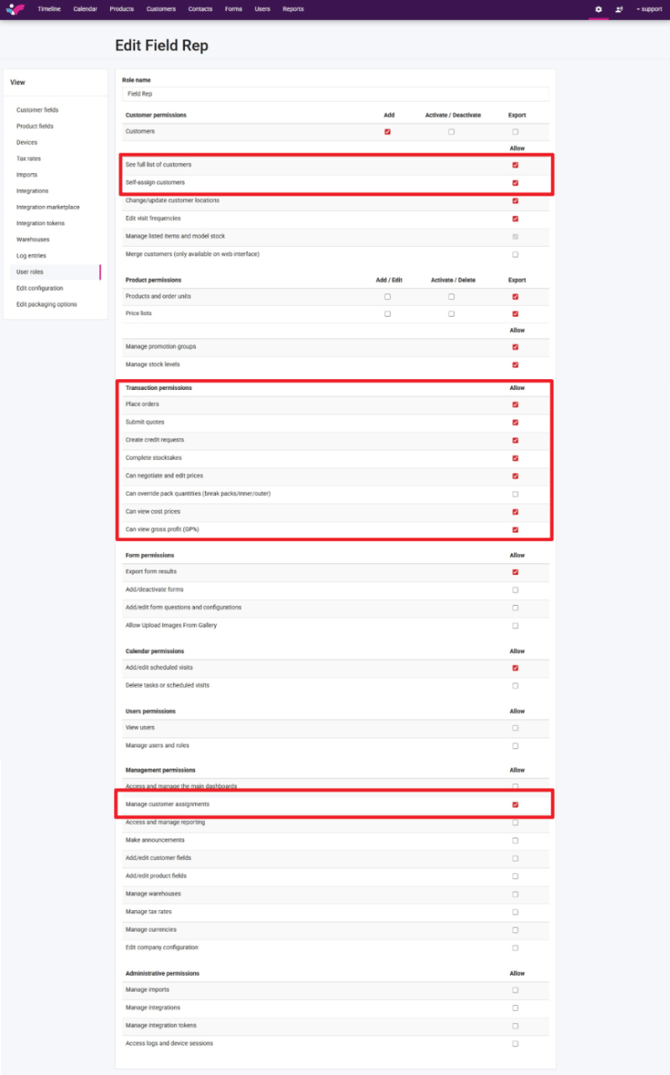
Before adding users, it is a good idea to review the default Skynamo user roles. Pay special attention to the Field Rep role, as this is commonly assigned to mobile users.
Please check whether users assigned to this role should be allowed to:
- Edit or negotiate prices
- See all customers
- Self-assign customers
- Access the required customer, product, order, and pricing information
- Add/remove customer/products
Adjust the role permissions or name if needed before inviting your users.
|
! |
Customer and product data flows only one way: from IQ Retail into Skynamo. Anything created directly in Skynamo won't sync back to IQ Retail, so most customers turn off the ability for Field Rep users to create customers or products directly to avoid mismatched records between the two systems. If your users do prospecting, you may need to allow them to add customers. |
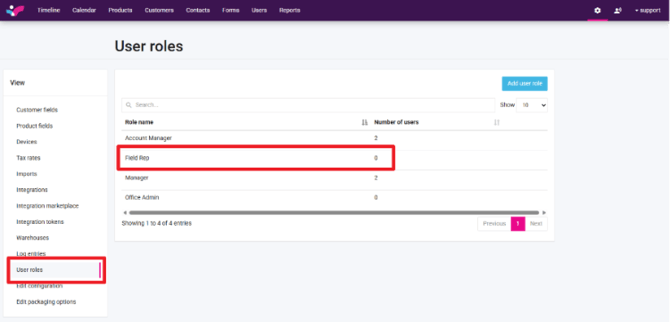
Step 12: Map Users to ERP Go Sales Rep Codes (if required)
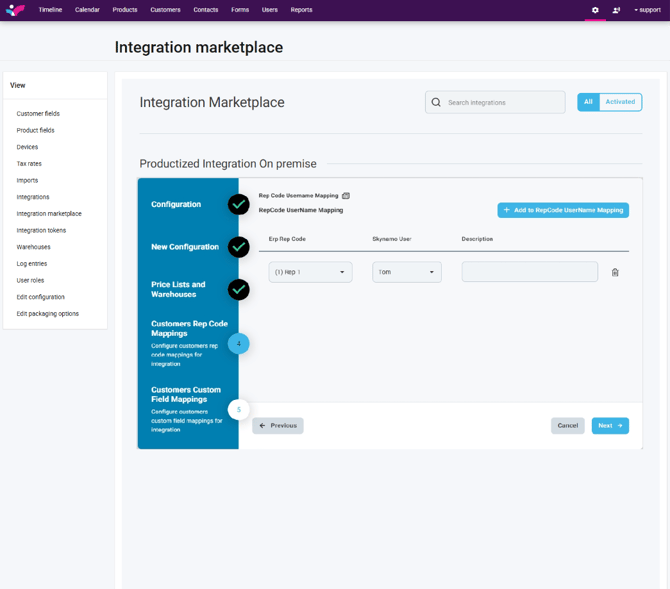
You can optionally map Skynamo users to specific ERP Go sales rep codes. This is done from the Integration Marketplace tab on Skynamo Insights by going through the integration configuration flow again. But you must first add your users: How to add a new user
Mapping users to sales rep codes helps ensure that users are automatically assigned to the customers linked to their rep codes in ERP Go.
|
! |
If needed, you can make all customers visible to all users and allow users to self-assign customers through user permissions. However, we recommend mapping each user to their ERP Go sales rep code, as these mappings are also used when orders are pushed back to ERP Go. |
✓ Setup Complete
Your Skynamo instance and ERP Go integration are now ready.
Your users can log into Skynamo and begin working with the ERP Go data that has been synced into the instance.
|
Appendix A: |
Data Fields Synced from IQ Retail |
The tables below list the customer (Debtor) and product (Stock) fields returned by the IQ Retail REST API, along with a suggested name for each field inside Skynamo.
Not all of these fields are or should necessarily be imported into Skynamo. This list shows most of the fields (with some omitted as they are irrelevant to Skynamo) available from IQ Retail to help you determine what to include when doing your field mapping.
Customer (Debtor) fields
|
IQ API Field |
Suggested Skynamo Field Name |
Notes |
|
Postal_Address_Details |
Postal Address |
4 address lines plus a postal code |
|
Delivery_Address_Details |
Delivery Address |
4 address lines plus a postal code |
|
Contact_Person |
Contact Person |
Main contact name for the account |
|
Credit_Limit |
Credit Limit |
|
|
Telephone_Numbers |
Telephone Number(s) |
Up to 2 landline numbers |
|
Cellphone_Number |
Cellphone Number |
|
|
Email_Address |
Email Address |
|
|
Fax_Number |
Fax Number |
|
|
Tax_Number |
VAT/Tax Number |
|
|
Area |
Area/Region Code |
e.g. CPT, WC |
|
Total_Balance |
Total Outstanding Balance |
|
|
Balance_Current, Balance_30/60/90/120/150/180_Days |
Age Analysis (Current, 30/60/90/120/150/180 Days) |
7 separate ageing buckets |
|
Status |
Customer Status |
Distinct from Debtor_OnHold below |
|
Settlement_Discount_Percentage |
Settlement Discount % |
|
|
Company_Registration_Number |
Company Registration Number |
|
|
Group_Account |
Group Account |
Links this customer to a head office/group account |
|
Comment |
Comment |
Free-text note on the account |
|
Payment_Method |
Payment Method |
|
|
LastPayment_Date, LastPayment_Amount |
Last Payment (Date & Amount) |
|
|
Store_Departments |
Departments Linked to Customer |
A list of one or more store departments (name, description) |
|
Terms |
Payment Terms |
e.g. “60 Days” |
|
Invoice_Discount_Percentage, Apply_As_Line_Discount |
Invoice Discount % |
|
|
Normal_Representative |
Sales Rep Code |
Links the customer to their IQ Retail sales rep — used for the Step 11 rep-code mapping |
|
Sales_Manager |
Sales Manager |
|
|
Debtor_OnHold |
On Hold Status |
See the on-hold note in Step 8 — Skynamo only supports full deactivation, not partial holds |
Product (Stock) fields
|
IQ API Field |
Suggested Skynamo Field Name |
Notes |
|
Barcode, Multiple_Barcodes |
Barcode(s) |
|
|
General_Code |
General/Alternate Code |
|
|
Major_Department, Minor_Department |
Department / Sub-Department |
|
|
Category |
Category |
e.g. FRU, BEV, SNA |
|
Range |
Range |
|
|
Brand |
Brand |
|
|
Item_Category |
Item Type |
e.g. “Stock Item” |
|
Pack_Size, Pack_Description |
Pack Size / Description |
|
|
Bin_Location |
Bin Location |
|
|
Average_Cost, Latest_Cost, Base_Cost, Previous_Cost, Highest_Cost, Future_Cost |
Cost Price Fields |
Several cost figures — most partners only need Average or Latest Cost, if any |
|
Minimum_Level, Maximum_Level, ReOrder_Level, ReOrder_Quantity |
Stock Level Thresholds |
|
|
Store_Serial_Numbers |
Track Serial Numbers |
|
|
Style, Colour_Number, Size_Number |
Variant Attributes |
For products with style/colour/size options |
|
Status |
Product Status |
e.g. ACTIVE |
|
Ordering_Method, Order_Formula_Number |
Replenishment Settings |
|
|
Override_GRV_Labels, Override_GRV_Label_Quantity |
GRV Label Overrides |
Internal, not typically relevant to Skynamo |
|
ABC_Classification, ABC_Classification_GP_Percentage |
ABC Classification |
Internal stock analysis classification |
|
Onhand, Onhand_Available |
Stock on Hand / Available Stock |
Available Stock is usually the more useful figure for reps, since it excludes reserved/allocated stock |
|
Discount_In_Modules |
Discount in Modules |
|
|
Shelf_Life |
Shelf Life |
|
Need help?
Contact the Skynamo Customer Success team:
support.skynamo.com
ERP Go Support
If you are running into any issues with the user or API setup on ERP Go, please reach out to their support team:
www.klipboard.com/en-za/products/erp-go
Training?